From the first sketch to the last splash, every step matters. Knowing each stage of the pool construction process helps you stay in control and stress-free. An in-ground swimming pool can add 5 to 25% to your property’s value — but only if it’s designed and built with care.
In this guide, we walk you through the key phases of creating a pool that feels as if it has always belonged in your garden, helping you avoid costly mistakes and ensuring your investment delivers beauty, comfort, and lasting value.
The choice of location
You don’t put a pool just anywhere in your backyard. For a good integration, it is preferable to choose a location that will not disturb the natural terrain profile too much. You should choose the sunniest location that is the most sheltered from the wind. The proximity of deciduous trees should be avoided. In this post, you will find the basics for choosing the best location for your pool, but don’t forget that professionals are always there to help you.
The design of the project
If you want a prefabricated pool (kit or shell) or an above-ground model, you can choose between the different manufacturers and find what you are looking for. In the case of a traditional masonry project, it is advisable to get involved in the design of the pool. You don’t build a pool for just one season, but to enjoy it for a long time and give added value to your home. If you want a pool that is perfectly integrated into the environment, we advise you to opt for a personalised project designed by a professional swimming pool builder. The pool builder or mason who will build it should submit a dimensioned general drawing with a sketch; in short, something that gives you a good idea of the finished project. This step can take from 1 week to 1 month depending on the case. Note: This step of the pool construction is very important to serve as evidence in case of dispute about the size or the services provided. You should not be satisfied with approximate estimates without precise and detailed drawings.
Building a swimming pool step by step
For an above-ground pool, the process is straightforward: unpack the kit and follow the assembly instructions.
For a concrete in-ground swimming pool, the work is more involved. Depending on the size of the project, the weather, and the availability of contractors, construction usually takes two to four months.
The tracing
This first step is about marking out your pool on the ground and checking that nothing will obstruct the digging.
From one or more fixed reference points (such as the corners of the house), you mark the exact location. For a free-form pool, the triangulation method is often used.
Remember: you’ll need to allow extra space around the perimeter for the excavation. This margin—between 50 cm and 1 m—makes room for building the walls and creating a trench for pipes and ducts.
The earthwork
Also known as excavation, this is when the ground is dug according to the planned shape and depth of your pool. The soil is either stored on-site or removed entirely.
The drainage
Drainage prevents water from building up under or around your pool. Depending on soil conditions, you may need a layer of gravel before sand and lean concrete.
In special cases—like flood-prone or swampy areas—a draining well is essential.
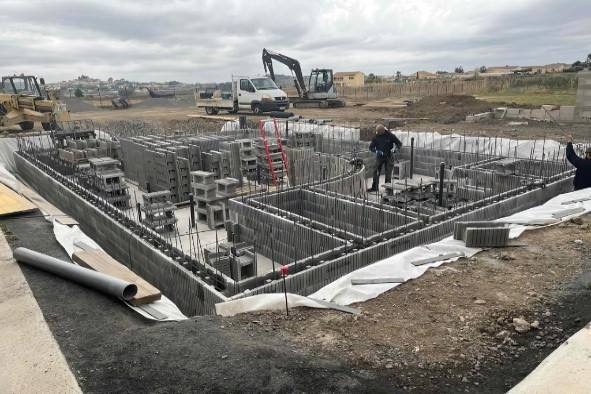
The structure of the pool
If you’ve chosen a prefabricated hull, now is the time for delivery. For a kit, it’s time to gather your tools—and perhaps some friends.
For traditional concrete pools, there are several techniques: poured concrete, reinforced concrete, or hollow blocks.
The pool base is a 20 cm thick concrete slab, reinforced with steel bars connected to the wall structure for strength.
The bottom drain is usually installed before the slab is poured—this also applies to infinity pools.
Walls are either built in one go (poured or shotcrete) or in stages (hollow blocks). This is also when pipes for inlets, skimmers, and underwater lights are positioned at the correct heights.
The pump room
You can build the pump room at the same time as the pool or adapt an existing nearby space.
A minimum of 2 m² is required, but the exact size depends on the pool’s dimensions and the equipment you choose.
Some prefabricated pump rooms are designed to be buried, and many come pre-equipped—saving time during installation.
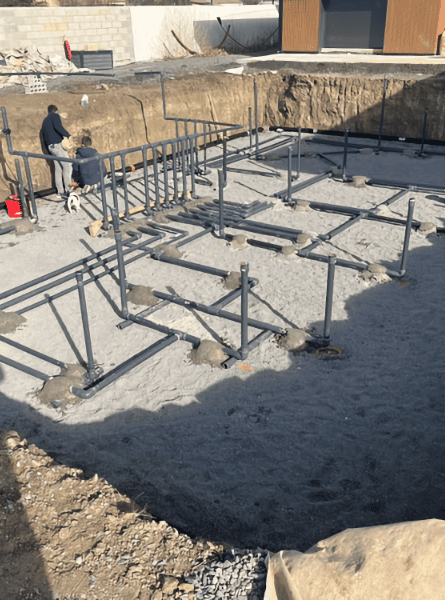
The hydraulic circuit
At this stage, the closed water circulation system is installed. This includes:
Connecting the pool to the pump room – in small pools, each inlet is connected individually; in larger pools, several inlets can be grouped.
Equipping the pump room – pumps, filters, heaters, and any automation systems.
For private pools, PVC Ø50 or Ø63 pipes are standard, depending on the pool’s size.
It’s also necessary to connect the system to your home’s main water supply and to wastewater drainage.
A protected power supply must reach the pump room, linked to a control panel that secures all electrical devices.
Both hydraulic and electrical installations must follow applicable standards for safety and performance.
The back fillling
Once the pipes are in place and protected with a layer of sand, the trench around the pool is filled.
A mix of stabilised sand or gravel prevents movement in the structure. The top layer can be finished with the earth removed during excavation.
Coping stones and pool lining
Coping stones frame the pool’s edge and must be non-slip. They are set with a slight slope away from the water to prevent runoff from contaminating the pool.
The interior finish can be tiles, liner, reinforced PVC membrane, silico-marble plaster, or glass-fibre reinforced polyester.
Each option has specific benefits, so it’s worth choosing according to your pool’s structure and usage needs.
Finishes and surrounds
Landscaping is the last step—and often underestimated. Removing rubble, cleaning the area, and planting vegetation can transform the pool’s environment.
Doing this before filling the pool helps keep the water clean from day one.
Filling the pool
The big moment. Invite your builder or contractor to be present for the first filling. They can check for leaks, ensure equipment works correctly, and give you a handover on maintenance and safety.
Morana's advices 👇
Building a swimming pool is not just about following a checklist of tasks. The key to a long-lasting, trouble-free pool is precision at every stage — from the first layout lines on the ground to the final fitting of coping stones. Take time to verify each step with your contractor, document the work in progress with photos, and make sure every technical detail is confirmed before moving on. This approach will save you from costly corrections later and ensure that your pool becomes a true asset to your home. challenging locations, success comes from a combination of clear design, the right materials, and close technical follow-up.
Your pool project deserves a professional support.
Total duration of the work
On paper, building an in-ground swimming pool can be done in just five to six months — if everything goes smoothly. That includes:
Design phase: around 1 month to refine your project.
Administrative approvals: minimum 1 month if your application is complete, plus time to hire contractors and order equipment.
Construction phase: on average 3 months for a standard masonry pool.
In reality, weather delays, busy contractors, and unexpected issues can stretch the schedule to eight or nine months. If you dream of swimming in early June, starting in February might seem reasonable — but remember, so do many others, and the rush can mean limited availability of skilled teams.
The optimal schedule
Plan ahead and work with the seasons to avoid stress and save money:
Design & paperwork: can be done any time, but start early to avoid last-minute rushes.
Best time for excavation: autumn, when the ground isn’t frozen and contractors are less busy.
Winter months: ideal for structural work — builders are more available and rates can be more flexible.
Spring: perfect for finishing touches and landscaping, so your pool is ready for the first warm days.
🗓 Recommended Pool Construction Timeline
📅 Late summer – early autumn
Refine concept, choose materials, prepare drawings, get permits, secure contractors.
📅 Autumn – winter
Structure, hydraulics, waterproofing.
📅 Spring
Coping stones, pool surrounds, pump room installation, interior lining, landscaping, water filling.
CONCLUSION
From the first lines on paper to the shimmering water on a summer morning, every choice you make along the way shapes the pool you’ll live with for decades. The right timing. The right hands. The right design. It’s what transforms a construction site into a space that feels as though it has always been part of your home.
To explore in more detail the techniques, systems, and design principles that turn good projects into great ones, visit our Infinity Pool Construction Guide. You’ll find expert advice and real-world examples to inspire your own build.